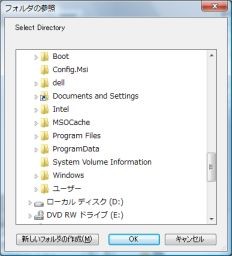
Adobe AIRでディレクトリ選択ダイアログ
AIRはローカルシステムにアクセスできるので、ディレクトリ選択ダイアログなんてものも使えます。
ちょっと試してみました。
<?xml version="1.0" encoding="utf-8"?>
<mx:WindowedApplication xmlns:mx="http://www.adobe.com/2006/mxml" creationComplete="initApp()">

  <mx:Script>
    <![CDATA[
      import mx.collections.ArrayCollection;
      private var directory:File = File.documentsDirectory;

      private function initApp():void {
          directory.addEventListener(Event.SELECT, directorySelected);
      }

      private   function onClick():void {
        try
        {
            directory.browseForDirectory("Select Directory");
        }
        catch (error:Error)
        {
            trace("Failed:", error.message)
        }

      }

      private function directorySelected(event:Event):void {
          directory = event.target as File;
          var files:Array = directory.getDirectoryListing();
          var filenames:ArrayCollection = new ArrayCollection();

          for (var i:uint = 0; i < files.length; i++) {
            filenames.addItem(files[i].name);
          }
          fileList.dataProvider = filenames;
      }
    ]]>
  </mx:Script>

  <mx:Button label="open" click="onClick()"/>
  <mx:List id="fileList" width="100%" height="100%"/>

</mx:WindowedApplication>
VideoDisplayで簡単FLV操作
FlexにはVideoDisplayというものがあります。
FLV(Flash Video)を簡単に扱えるみたいです。
で、サンプルはこんな感じ。
<?xml version="1.0" encoding="utf-8"?>
<mx:WindowedApplication xmlns:mx="http://www.adobe.com/2006/mxml">
  <mx:Script>
    <![CDATA[
      import flash.filesystem.File;
      import flash.net.FileFilter;

      private var movie:File = new File();

      private function fileOpen():void {
        if (vd.playing) {
          vd.pause();
        }
        try {
          var flvFilter:FileFilter = new FileFilter("Flash Video(*.flv)", "*.flv");
          var allFilter:FileFilter = new FileFilter("すべてのファイル(*.*)", "*.*");
          movie.browseForOpen("開く", [flvFilter, allFilter]);
          movie.addEventListener(Event.SELECT, onSelect);
        } catch (error:Error) {
          trace("Failed:", error.message);
        }
      }

      private function onSelect(event:Event):void {
        var f:File = event.target as File;
        vd.source = f.nativePath;
        vd.play();
      }
    ]]>
  </mx:Script>
  <mx:Canvas width="100%" height="100%">
    <mx:VBox width="100%" height="100%">
      <mx:VideoDisplay id="vd" width="100%" height="100%"/>
      <mx:HBox width="100%">
        <mx:Button label="open" click="fileOpen();"/>
        <mx:Spacer width="100%"/>
        <mx:Button label="play" click="vd.play();"/>
        <mx:Button label="pause" click="vd.pause();"/>
        <mx:Button label="stop" click="vd.stop();"/>
      </mx:HBox>
    </mx:VBox>
  </mx:Canvas>

</mx:WindowedApplication>
開始、一時停止、停止が簡単に実現できてしまってます。
「これは簡単でいいな」と思っていたのですが、O'REILLYの『Flex3 Cookbook』の"8.9 Smooth Video Displayed in a Flex Application"を見ると、VideoDisplayではflash.media.Videoのsmoothingプロパティを設定できないと書いてあります。
スムージングが必要な場合はVideoDisplayではなく、flash.media.Videoを使わないとダメみたいですね。
そのサンプルはまた今度にします。。。
HTTPServiceを使ってみる
FlexのHTTPServiceを使うとWebサービスの利用が簡単になりそうなのでちょっと使ってみました。
(今回のサンプルではlivedoorのWeather Hacksで提供されている「お天気Webサービス(REST)」を使用してます)
さっそく、コード。これはAdobe AIRのコードです。
<?xml version="1.0" encoding="utf-8"?>
<mx:WindowedApplication xmlns:mx="http://www.adobe.com/2006/mxml" creationComplete="init()">
  <mx:Script>
    <![CDATA[
      import mx.rpc.events.ResultEvent;
      private function init():void {
        service.send();
      }

      private function serviceResult(event:ResultEvent):void {
        tarea.text = event.result as String;
      }
    ]]>
  </mx:Script>

  <mx:HTTPService id="service" url="http://weather.livedoor.com/forecast/webservice/rest/v1"
    resultFormat="text" result="serviceResult(event)">
    <mx:request>
      <city>63</city>
      <day>tommorrow</day>
    </mx:request>
  </mx:HTTPService>

  <mx:TextArea id="tarea" width="100%" height="100%" editable="false" />
</mx:WindowedApplication>
※パラメータのcityで63、dayにtomorrowをしていますが、これは「東京の明日の予報」を取得することを意味しています。
パラメータの詳細はお天気Webサービス仕様を参照。
これを実行すると、つぎのようなリクエストがとびました。
GET /forecast/webservice/rest/v1?city=63&day=tommorrow HTTP/1.1
Referer: app:/Test.swf
Accept: text/xml, application/xml, application/xhtml+xml, text/html;q=0.9, text/plain;q=0.8, text/css, image/png, image/jpeg, image/gif;q=0.8, application/x-shockwave-flash, video/mp4;q=0.9, flv-application/octet-stream;q=0.8, video/x-flv;q=0.7, audio/mp4, application/futuresplash, */*;q=0.5
x-flash-version: 9,0,115,0
User-Agent: Mozilla/5.0 (Windows; U; en) AppleWebKit/420+ (KHTML, like Gecko) AdobeAIR/1.0
Host: weather.livedoor.com
Connection: Keep-Alive
Cookie: xxxxxxxxxxxxxxxxxxxxxxxxxxxxxxxxxxxxxxxxxxxxxxxxxxxx
※Cookieは伏字にしてます。
cityとdayというパラメータがちゃんと設定されていますね。
で、実行結果はこれ。

簡単にアクセスできますね。
なお、HTTPServiceのresultFormatプロパティを"text"にしてますが、TextAreaに単純に貼り付けるためにこうしました。
本来は"e4x"などを設定して、XMLとして扱った方がいいでしょう。
ちなみに、Adobe AIRからアクセスするとUser-Agentはこうなんるんですね。
User-Agent: Mozilla/5.0 (Windows; U; en) AppleWebKit/420+ (KHTML, like Gecko) AdobeAIR/1.0
Adobe AIRでシステムトレイを使ってみる
Adobe AIRでシステムトレイを使ってみます
サンプルコードは以下。
<?xml version="1.0" encoding="utf-8"?>
<mx:WindowedApplication xmlns:mx="http://www.adobe.com/2006/mxml" creationComplete="init()">

  <mx:Script>
    <![CDATA[
      [Embed(source='toast.png')]
      private var dockIcon:Class;

      private var exitMenu:NativeMenuItem = new NativeMenuItem("Exit");

      private function init():void {
        var tip:String = "TEST AIR";
        var shellMenu:NativeMenu = new NativeMenu();
        shellMenu.addItem(exitMenu);
        exitMenu.addEventListener(Event.SELECT, onExit);

        var app:NativeApplication = NativeApplication.nativeApplication;
        if (NativeApplication.supportsDockIcon) {
          // Mac
          (app.icon as DockIcon).menu = shellMenu;
        } else {
          // Windows
          (app.icon as SystemTrayIcon).menu = shellMenu;
          (app.icon as SystemTrayIcon).tooltip = tip;
        }
        app.icon.bitmaps = [ (new dockIcon() as Bitmap).bitmapData ];
      }

      private function onExit(evt:Event):void {
        close();
      }
    ]]>
  </mx:Script>
</mx:WindowedApplication>
if (NativeApplication.supportsDockIcon) {
  // Mac
  (app.icon as DockIcon).menu = shellMenu;
} else {
  // Windows
  (app.icon as SystemTrayIcon).menu = shellMenu;
  (app.icon as SystemTrayIcon).tooltip = tip;
}
ツールチップはこんな感じで

※システムトレイのアイコンはIconsPediaのものを使いました。

